Canva is one tool I really rely on in my business. Not being a designer myself, my few attempts at making graphics for clients have been far from successful. Its not very often the graphics they turn out great. Usually they are ok or passable. I know there are designers who see it and go “Who is doing their work?”
In September of last year, I found Canva. Canva, for those who don’t know, is a graphics creating service. You can create a variety of different graphics from social media to business cards. And pretty much everything in between. It looks like you paid someone do do your work for you, when you did it yourself.
Before we get started know that Canva isn’t 100% free. You maybe asking “What do you mean not 100% free?” There are plenty of great designs that are free. Others are free if you use your own images and lastly others you pay for the design you are using. But before you discount the service, know most of the fees are $1. That’s right a buck! It’s very reasonable and perfect for small businesses.
Getting Started
Create an account: First thing you need to do is create an account. This can be done through Facebook connect, Google Account or email a password. The easiest is through Facebook or Google. But, if you don’t want to tie it to a social service then sign up with an email.
Main Page
When you log in to Cavna you will see at the top a list of images you can create. The most popular are on the main page. Click the more button to see all the types of accounts you can create. Also, if you have a special custom size you can create that as well with the “Use Custom Dimensions”
Also on this page you will see any designs you have already created. If your account is new it will be blank. As you can see I have already created a few designs in my account.
Creating a Graphic
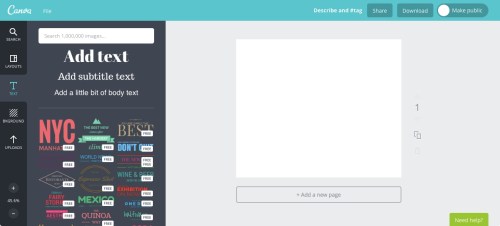
Once you open the graphic you want. You will see several options on the left side. They are search, layouts, text, background and uploads.
Search
Is just that you can search for anything you need. It could be a grid, frame, shape illustrations, icons, photos, charts and more. Canva has over 1 million images.
Layouts
This is where you will find all the great layouts. One of the best things about Canva, is they create seasonal layouts. They are for what ever holiday is coming up on the calendar. They are generally listed first in the list. After those you see regular layouts. Layouts are free and paid. If it’s paid you will see a $ symbol on the layout. If you click the info (which is an I in a circle) you will see what parts that cost. If it’s an image you can up load your own image to have it be free. If, however you like the design just pay the $1 per item. After you finish and download you have up to 24 hours to make changes to a paid layout. After that it is locked. This is great if you misspell a word. It’s a simple fix.
Text & Background
If you want to create your own image the next tabs are for you. The text has various text over lays that you can use on your graphic. Simply upload a picture and choose what text you want to use.
Background is a series of different backgrounds. This is great if you want to create a graphic of text. You can post a quote, sale information or more. Note like the layout tab both of these contain paid text and backgrounds.
Uploads
This is where you upload all your pictures. You can keep them in the service or delete them if no longer needed. Uploads allows you to upload images from your computer (not if on iPad your cameral roll will show up as well). Also you may sign in through Facebook to show all your images you’ve already up loaded there. I am hoping they will add the new Google Photos soon.
After you have uploaded your pictures and picked what graphic you want to make its time to get started creating.
Step 1: Choose the layout you want to use
Step 2: Drag your picture into the the layout. If you just click the picture it will show up on top of the image. You must drag and drop it till you see it fill out the layout. After it’s in the layout you can change the position and filter of the image. Note some layouts have specific filters it uses. If it’s too dark or light you can adjust it.
Step 3: Change the text. You can change all the text listed. Put in exactly what you want it to say. Then if necessary change the color of the text to show up better. Not every picture is created equal and sometimes it will take a bit of trial and error to make the text show up.
Step 4: This is an optional step. If you want to make several of the same graphic and change out pictures. ust click the two rectangles to the right of the picture and it will duplicate your image you have finished. Just drag in a new picture and adjust text if necessary.
Step 5: Save your Image. There are two ways to save your image. The one I prefer is the download. That way I have a copy on my hard drive. Canva allows you to save it as an image (png file) or PDF.
The other way is to share it on Facebook, Twitter or email. Email allows you to share it and give them edit capabilities. Lastly in this step you can make your designs public. If you want to share with everyone on Canva feel free or the default is to keep it private.
There are some features I’d like to see. The main one would be the ability to resize an image and retain the ratio. Right now you pull the side of the picture and it can get stretched out. Next would be outline text. Text that could have a black or white outline to show up better in images. These are just two minor problem in a great service.
This is a quick overview of Canva. It’s a super simple yet powerful tool for creating graphics. As I posted earlier this month, Canva for work is coming with some pretty cool features. I’m in talks to hopefully get early access for a review when it is released! I will have more advanced text and image tutorials coming up!


